If you’re planning a birthday party and want a centerpiece that doubles as a conversation starter, a photo opportunity, and, let’s be honest, a crowd-pleasing treat, DIY candy centerpieces check every single box.
They’re colorful, customizable, genuinely fun to make, and can be tailored to suit any age, theme, or color palette.
The best part? They don’t require a professional touch or an extravagant budget.
A few supplies from your local craft store, a trip down the candy aisle, and a bit of creative energy is honestly all it takes to create something that looks like it cost three times what it did.
This guide covers a range of DIY candy centerpiece ideas, from simple beginner projects to more elaborate statement pieces, with step-by-step instructions for each, styling tips, and everything you need to know to pull off a candy centerpiece display that genuinely wows.
You will like
20 Fun And Natural Table Seating Ideas To Wow Your Guests
DIY Halloween Dec orations You Can Make With Kids
Simple And Mess- Free Halloween Decorations For The Classroom

Basic Supplies for DIY Candy Centerpieces
Before you get started, gather a few basic supplies. You won’t need every item for every project, so simply choose the ones that fit the centerpiece you want to make.
- Containers: Glass vases, mason jars, clear acrylic containers, buckets, or tiered stands
- Floral foam or Styrofoam: To anchor lollipops, skewers, and candy picks
- Wooden skewers or lollipop sticks: To add height to your candy display
- Ribbon, twine, or washi tape: For decorating containers
- Hot glue gun and glue sticks: To secure candy and decorative accents
- Tissue paper or crinkle paper filler: To fill containers and add color
- Cellophane wrap: Perfect for bouquet-style candy arrangements
- Balloon sticks or floral wire: To create extra height and support
- Candy: Lollipops, gumballs, wrapped chocolates, candy corn, rock candy, jawbreakers, gummy bears, candy canes, and more
- Theme decorations: Number balloons, ribbon curls, themed toppers, mini signs, or birthday picks
10 DIY Candy Centerpiece Ideas
1. Classic Lollipop Bouquet
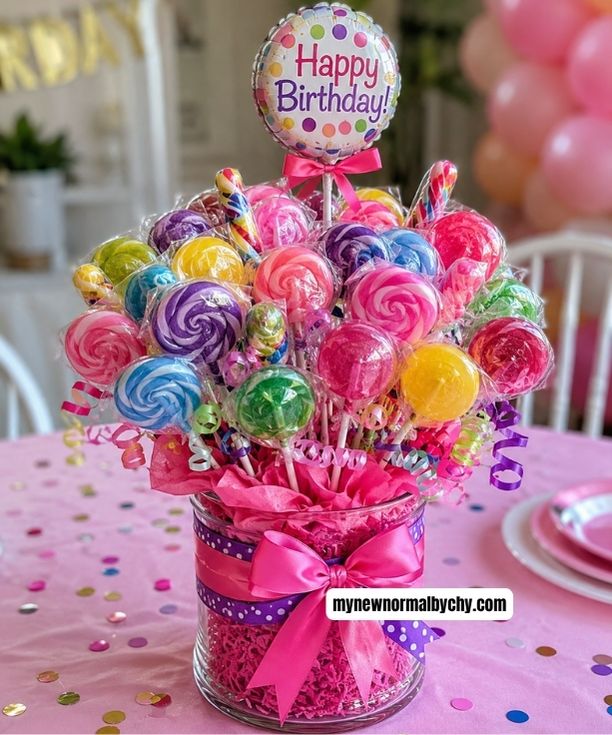
The classic lollipop bouquet is one of the most popular candy centerpiece ideas. Not only is it colorful and eye-catching, but it’s also beginner-friendly and easy to customize for any party theme.
Supplies Needed
- Glass vase or mason jar
- Floral foam or Styrofoam cut to fit the container
- Tissue paper or crinkle paper filler
- Assorted lollipops in coordinating colors
- Ribbon or twine
How to Make It
- First, cut the floral foam or Styrofoam so it fits snugly inside your container. Leave it sitting just below the rim.
- Next, cover the foam with tissue paper or crinkle paper filler. Tuck the edges down to hide the foam completely.
- Then, insert the lollipops around the outer edge of the foam. Angle them slightly outward to create a full, bouquet-like shape.
- Continue filling the center with more lollipops. Mix in smaller candy sticks if you’d like, and gradually build more height toward the middle.
- After that, tie a ribbon or twine around the vase for a finished look.
- Finally, attach a themed topper, birthday tag, or small balloon to the tallest lollipop for an extra festive touch.
Styling Tip
For a polished look, stick to two or three candy colors. However, if you’re decorating for a Candyland or circus-themed party, a bright rainbow mix works beautifully. You can also combine regular and oversized lollipops to add more height, texture, and visual interest.
You will also like
20 Creative Rock Painting Ideas To Keep Kids Busy
15 Budget Jungle Gym Ideas For Moms
How To Mix And Match Throw Pillow Combinations For A Cozy Living Room
2. Candy-Filled Vase
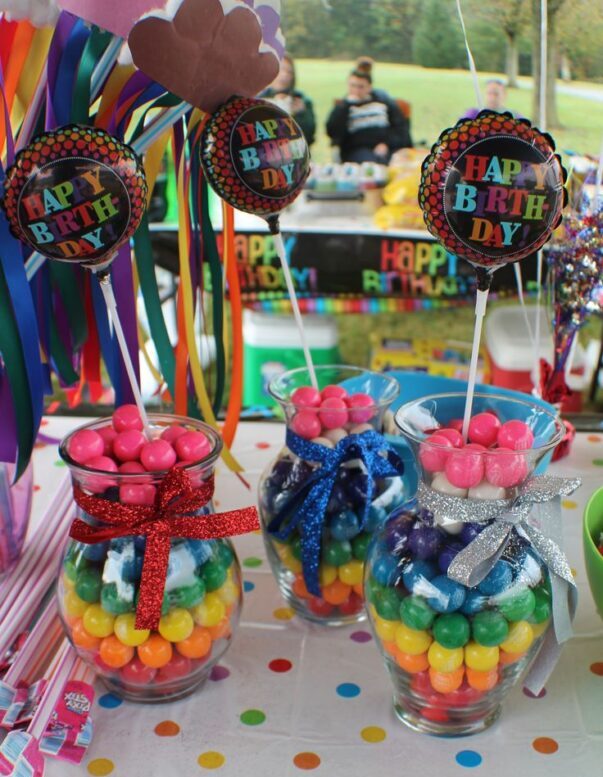
If you love simple party décor, this candy-filled vase is a perfect choice. A clear glass vase filled with colorful candy creates an elegant centerpiece with very little effort.
Supplies Needed
- Clear glass vase or cylinder
- Gumballs, M&Ms, wrapped chocolates, jelly beans, or jawbreakers
- Decorative topper
How to Make It
- Start with a clean, clear vase. A simple shape lets the candy stand out.
- Next, fill the vase with your favorite candy. For a layered look, add one color at a time and smooth each layer before adding the next.
- If you’re using just one color, pour in the candy and gently shake the vase so it settles evenly.
- Then, add a decorative topper. You can use a small balloon cluster, a birthday sign, or a few lollipops inserted into the top layer.
- Finally, wrap the vase with ribbon or washi tape for an extra decorative touch.
Styling Tip
Match the candy colors to your party theme for a polished look. For example, pink and gold M&Ms in a gold-trimmed vase topped with a “Happy Birthday” balloon look elegant and take only a few minutes to assemble.
You will also like
Backyard Summer Date Night Ideas For Couples
Aesthetic Picnic Ideas You’d Love
18 Stay-At-Home Date Nights For Couples In The Postpartum Season
3. Candy Bouquet (Wrapped Like Flowers)

A candy bouquet looks just like a fresh flower arrangement, but it’s made entirely from sweet treats. Although it looks impressive, it’s surprisingly easy to create.
Supplies Needed
- Assorted candy bars, lollipops, and wrapped chocolates
- Wooden skewers or lollipop sticks
- Clear tape or rubber bands
- Tissue paper in two colors
- Cellophane wrap
- Ribbon
How to Make It
- First, attach each piece of candy to a wooden skewer using tape or a small rubber band.
- Next, arrange the candy just as you would fresh flowers. Place the tallest pieces in the center and shorter ones around the edges.
- Once you’re happy with the shape, secure the stems together with a rubber band.
- Wrap the bouquet with one sheet of tissue paper and tape it in place.
- Then, add a second sheet in a contrasting color to create extra depth.
- Cover the bouquet with cellophane and tie it tightly with a ribbon.
- Finally, fluff the cellophane at the top for a gift-worthy finish.
Styling Tip
This centerpiece also makes a thoughtful birthday gift. To make it even more personal, use the birthday person’s favorite chocolates or match the candy to your party theme.
4. Candy Tower Centerpiece

If you want to make a statement, a candy tower is an excellent choice. It adds height, color, and plenty of visual appeal. Plus, guests can enjoy the candy throughout the party.
Supplies Needed
- Tiered cake stand or stacked plates
- Assorted candy in coordinating colors
- Birthday topper, mini balloon bouquet, or themed figurine
How to Make It
- Begin by placing your tiered stand on a sturdy, level surface.
- Fill each tier with one type or color of candy for a clean, organized look.
- Slightly mound the candy on the top tier to create a full appearance.
- For added charm, let a few pieces spill gently over the lower tiers.
- Finish by placing a birthday topper or balloon cluster at the very top.
- Scatter a handful of matching candy around the base to complete the display.
Styling Tip
A candy tower works beautifully as the centerpiece of a dessert or candy bar. Surround it with smaller candy jars and bowls to create a balanced, eye-catching display.
You will also like
Couple Date Ideas For Parents Who Need A Break
How I make $1,500 A Month As A Stay-At-Home Mom Teaching English Online
5. Mason Jar Candy Garden
A mason jar candy garden is a simple yet charming centerpiece. Arrange three to five jars of different heights, each filled with colorful candy, to create a display that suits almost any birthday theme.
Supplies Needed
- Three to five mason jars in different sizes
- Assorted candy (one type per jar)
- Ribbon or twine
- Chalkboard labels or gift tags
- Optional greenery, floral picks, or mini balloons
How to Make It
- Fill each mason jar with a different type of candy, such as gumballs, rock candy, or wrapped chocolates.
- Choose colors that complement each other for a cohesive display.
- Tie ribbon or twine around each jar and finish with a neat bow.
- Add a chalkboard label or gift tag with the candy name or a fun birthday message.
- Arrange the jars in a loose cluster. For extra dimension, place some jars on small risers or wooden blocks.
- Finally, fill the gaps with greenery, balloon picks, or scattered candy.
Styling Tip
This centerpiece is perfect for children’s parties because guests can easily help themselves. Set out small candy scoops or treat bags so everyone can take a sweet souvenir home.
6. Candyland-Themed Centerpiece
Planning a Candyland party? Then your centerpiece should be just as playful. Think oversized lollipops, bright colors, candy cane stripes, and plenty of sweet treats.
Supplies Needed
- Large foam ball or cone
- Oversized lollipops or candy canes
- Assorted wrapped candy
- Weighted container or decorative box
- Floral foam
- Ribbon in bright or candy cane colors
How to Make It
- Secure the foam ball or cone to a weighted base using hot glue or a wooden dowel.
- Next, cover the foam with individually wrapped candy. Use toothpicks or short skewers where needed for extra support.
- Evenly space oversized lollipops or candy canes throughout the arrangement.
- Wrap the base with colorful paper or striped ribbon.
- Finish with a “Happy Birthday” topper or themed decoration.
Styling Tip
Because this centerpiece is large and eye-catching, place it on the cake table or dessert station. It works best as a focal point rather than repeating it on every guest table.
7. Rock Candy Centerpiece

If you’re decorating for an older child, teen, or adult birthday, a rock candy centerpiece offers a more elegant look. The sparkling crystals catch the light beautifully and instantly elevate your table décor.
Supplies Needed
- Rock candy sticks in coordinating colors
- Tall glass vase or cylinder
- Decorative sand, glass beads, or white rice
- Ribbon or twine (optional)
How to Make It
- Fill the bottom of your vase with decorative sand, glass beads, or rice to keep the candy sticks upright.
- Insert the rock candy sticks, arranging them into a fan or bouquet shape.
- Alternate colors or group similar shades together for added visual interest.
- Vary the heights slightly for a more natural look, or keep them even for a modern design.
- Finish by tying ribbon around the vase if desired.
Styling Tip
Rock candy centerpieces are ideal for milestone birthdays, elegant celebrations, and candy buffets. Pair them with glass décor and metallic accents for a sophisticated finish.
8. Balloon and Candy Combo Centerpiece
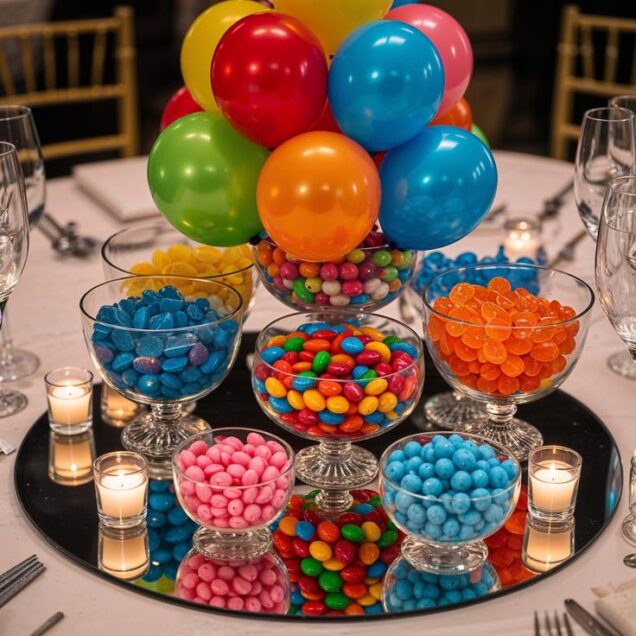
Want a centerpiece that instantly says “birthday”? Combine balloons and candy for a fun display that adds height, color, and texture to your party table.
Supplies Needed
- Candy-filled jar or decorated box (weighted base)
- Balloon sticks or floral wire
- Three to five balloons
- Assorted wrapped candy
- Curling ribbon
How to Make It
- First, fill your container with candy to create a sturdy, weighted base.
- Inflate the balloons and attach them to balloon sticks.
- Insert the balloon sticks into the candy until they stand securely.
- Next, attach wrapped candy to additional balloon sticks and place them between the balloons at different heights.
- Finally, add curling ribbon around the balloon cluster for a festive finish.
Styling Tip
Foil balloons shaped like stars, numbers, or “Happy Birthday” signs give this centerpiece a more polished look than standard latex balloons.
9. Ombre Candy Jar
An ombre candy jar is simple to make but looks incredibly elegant. By layering candy in different shades of the same color, you can create a beautiful gradient that complements almost any party theme.
Supplies Needed
- Large clear glass jar or vase
- Candy in three to five shades of the same color
- Decorative topper
How to Make It
- Choose your color order, either darkest to lightest or the reverse.
- Pour the first layer of candy into the jar and smooth it evenly.
- Continue adding one shade at a time, pouring gently to keep the layers distinct.
- Repeat until the jar is full.
- Finish with a balloon, flowers, or a personalized birthday tag.
Styling Tip
M&Ms, jelly beans, and gumballs are excellent choices because they’re available in a wide range of colors. If you’re looking for a specific shade, order your candy ahead of time.
10. Candy Number Centerpiece
A candy-covered number is both a centerpiece and a fun photo prop. It’s especially popular for milestone birthdays and can even become a keepsake after the celebration.
Supplies Needed
- Large foam or cardboard number
- Hot glue gun
- Assorted wrapped candy or gumballs
- Wooden dowel or thick straw
- Weighted base or decorative container
How to Make It
- Paint the number first if any areas will remain visible.
- Working in small sections, apply hot glue and press the candy firmly into place.
- Continue covering the entire surface, filling small gaps with smaller candies.
- Attach a wooden dowel to the back of the number using hot glue and strong tape.
- Insert the dowel into a weighted base so the centerpiece stands securely.
Styling Tip
This centerpiece is perfect for milestone birthdays like a 1st, 5th, 10th, 16th, 18th, or 21st birthday. Display it on the cake table or near the photo booth for maximum impact.
Tips for Styling Your Candy Centerpiece Display
Want your candy centerpieces to look professionally styled? Keep these simple tips in mind.
- Match your party colors. Choose candy that complements your party palette for a coordinated look.
- Vary the heights. Mix tall, medium, and short centerpieces to create depth across the table.
- Group in odd numbers. Clusters of three or five jars or vases tend to look more balanced than even-numbered groupings.
- Scatter extra candy. Sprinkle a few wrapped candies around each centerpiece to make the display feel fuller and more festive.
- Label your candy. If you’re creating a candy bar, use small tags or chalkboard signs so guests know what’s inside each container.
- Consider the weather. For outdoor parties, choose candies that won’t melt easily, such as lollipops, hard candy, rock candy, or gumballs.
Frequently Asked Questions
How far in advance can I make candy centerpieces?
Most candy centerpieces can be assembled one to three days before the party. Store them at room temperature and away from direct sunlight. However, if you’re using chocolate, make it closer to the event or keep it in a cool, air-conditioned space. Avoid refrigerating candy, as moisture can make it sticky.
How much candy do I need?
The amount depends on your container. As a general guide, a medium vase or mason jar usually holds one to two pounds of candy. Larger projects, such as candy towers or number centerpieces, may require considerably more. It’s always a good idea to buy a little extra.
Are candy centerpieces safe for young children?
Yes, but choose larger wrapped candies when possible to reduce choking hazards. In addition, keep centerpieces out of reach of toddlers and always supervise young children around candy displays.
Can guests eat the candy afterward?
Absolutely! Individually wrapped candy that hasn’t been opened is safe to enjoy after the party. However, candy glued onto decorations, such as a candy number, should not be eaten.
Which centerpiece is the most budget-friendly?
The candy-filled vase and the mason jar candy garden are among the most affordable options. Since they require only a few supplies, they’re perfect if you’re decorating on a budget. Buying candy in bulk can also help you save money.
Do candy centerpieces work for adult birthday parties?
Definitely. Simply choose a more sophisticated style, such as a rock candy arrangement, an ombre candy jar, or a chocolate bouquet. Pair them with neutral colors, glass containers, and elegant ribbons for a refined look.
Make the Most of Your Candy Centerpieces
DIY candy centerpieces are a fun and affordable way to add personality to any birthday celebration. Better yet, they’re easy to customize to match your party theme, favorite colors, and budget.
If you’re a beginner, start with a simple lollipop bouquet or candy-filled vase. As your confidence grows, you can try larger projects like candy towers or candy-covered numbers.
Most importantly, have fun with the process. Candy naturally brings color, excitement, and a sense of celebration. With a little creativity, you can turn a few sweet treats into a centerpiece your guests will remember long after the party is over.
Leave a Reply